Sunday 31 May 2015

Almost there now


The first thing to report on is the fitting of the new doors and handles for the cupboards


Nice selfie in this one, not.

On a trip to Homebase we found these mosaic tiles.

We thought these would go nicely around the big mirror above the sink. It took 3 days to stick them and grout them.

 This is the new shaver socket. The new ones allow both sockets to be used.
There were some tiles left, so I used them around the window. The thin strip of UPVC looked a bit dated. 
You will see we have added a theme, beach-huts. This little one came from John Lewis...

There are hooks for things in the same style.
So here are some views of the nearly finished project.
 Looking in from the door
 the view into the shower
and the view of the mirror from the shower.


Sunday 17 May 2015

Tiling finished


Finished the last 2 pieces of tiling. It was great not having to clean out the cement bucket at the end, it can just go to the dump now.


I have applied 5 lots of grout so far. The base grout colour is titanium, which suits the floor tiles and mosaic inside the shower. For the other tiles I have been adding black cement dye to match the tiles. the wall tiles are about 0.25% dye, and the strata tiles in the bath are 0.05%!!!
Yesterday I used up the last of the diamond tipped hole cutters to make screw holes for the radiator and loo roll holder. I then connected the new radiator - NO LEAKS!


Friday 15 May 2015

The top of the window.


It rained all day yesterday, so I spent most of the day in the loft removing the old lights and fan, and putting in the new ones with chrome surround.


The switches for both are now outside the room rather than by pull cord.
In the evening I grouted inside the shower, adding 2% grey dye to the grout mix. It is too dark so I will try 1% and do it again.
 I have now tiled to the top of the window on both sides.
 I could then set the 2 tiles into the top of the window opening.
 I have supported the top tiles whilst they dry with a standard West Bromwich stick of wood, and 2 wedges to get the level correct. The edge strip was then cut and fitted over these 2 tiles, and cemented into place at the top.
Having removed the fan from the wall. I have now been able to tile over the hole.

We tested the shower today. I needed 40 degrees and Margaret 43 degrees. The water was contained by the glass very well. Sorry, no pictures!


The window wall

This wall was a challenge as I wanted to get a nice neat edge using thin chrome strip. I set the 2 tiles on the ledge, inserted the trim, and then tiled up to it.
 Taking pictures including the window is tricky because of the light.
 On the right side, I could set the edge strip with the bottom tile.
On the other side I had to tape it as a special bit of cutting was needed.
 This is the cut piece, it went in a treat.
While this was drying, I put up the glass for the shower, and the shower control unit.


Wednesday 6 May 2015

Broken the back of the tiling.

 Today (Tuesday 5th) I tackled the Toilet area. Disconnected the toilet and replaced the stopcock which did not turn off properly. Cut 4 inches off the toilet outlet to move the toilet closer to the radiator wall.
Then I tiled behind it.

 I also tiled behind the door, almost to the top.
 I tiled the floor under the toilet area. I used these hand things to level the floor.
These are the spacers I have been using. You can see through them to make sure the joint behind is square.Once the floor was dry and set, I reconnected the toilet.

Wednesday. I am trying to finish the floor and the walls that I have started. I have one wall tile left to do, and 3 floor tiles. I would have finished the floor, but I broke the last tile, so had to wait to get a new one.

I had 96 big tiles at the start, and have 24 left now, to do the window wall.

Next job is re-fitting the door so that it closes. The tiles have raised the floor by about 11mm.

Monday 4 May 2015

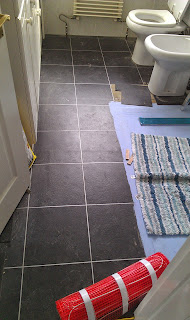
Under floor heating day

I have finished the tiling within the shower area, apart from the finishing of the nook. These tiles had to be cut on the wet tile cutter, and I made a special tunic to keep me dry!

Those tiles are all up, except from completing the nook, and I have started on the flat wall tiles, ready to mark out where the shower screen goes.
I can then start laying floor tiles.

Under the floor will go a heated floor cable. First I had to get the wires through the wall to the controller on the other side.


Then I cleaned the floor ready to put down the cable.
The cable needed a little organisation so the feet are warm when on the toilet!
Finally, the system is tested before laying the tiles over it.


Saturday 2 May 2015

tiling

The tiles for the shower area are light grey, called Strata. Big tiles, 67cm x 45cm.
They have gone on reasonably well. The grout gap is 1.5mm. The hole for the lower shower outlet worked first time, and cutting the tiles for the nook was not too complicated. One more mix of tile adhesive should see this complete today. I have been spreading onto the tiles rather than the wall for this section. 

We tested the shower system before covering in the pipes, picture to follow with the next section.